Located in the Hampshire town of Gosport, across the harbour from Portsmouth on the south coast of England, the Royal Navy Submarine Museum tells the story of the 'silent service', from its founding in 1901 to the present. Originally established as the Submarine Branch Collection in 1963 and initially housed in St Ambrose Church inside HMS Dolphin, the Royal Navy Submarine Service's shoreside home in Gosport, the museum was moved to a new location outside the submarine base in 1978 to better promote itself and permit full access by the general public. The retired A-class submarine HMS Alliance was added to the museum's collection in 1981, and a new exhibition building was added in 1983. In 2001, an addition to the museum provided a climate-controlled indoor space in which to display HMS Holland I, the Royal Navy's first submarine. In addition to Alliance and Holland I, notable exhibits in the museum today include an interactive gallery on the design and operation of submarines; a chronological gallery on Royal Navy submarine operations through war and peace; and the Second World War midget submarine X24. Admission to the Royal Navy Submarine Museum is included in the 'Full Navy' ticket sold by Portsmouth Historic Dockyard or can be purchased separately for £18.00 (adult rate in 2019).
Photos taken 13 October 2019
 |
| Approaching the museum by waterbus from Portsmouth. HMS Alliance is on display in a cradle on the jetty next to the museum building, built to resemble the stylised upper hull and fin of a submarine. |
 |
| The entrance to the Royal Navy Submarine Museum's Sir John Fieldhouse Building, named after Admiral of the Fleet Sir John Fieldhouse, GCB, GBE (1928-1992), a Royal Navy submariner who later went on to command the naval task force dispatched from Britain to retake the Falkland Islands (Operation Corporate) following the Argentine invasion in 1982. Sir John went on to serve as First Sea Lord and Chief of Naval Staff (1982-1985) and Chief of the Defence Staff (1985-1988) before retiring from the Royal Navy in December 1988. |
 |
| An historic aerial photograph of HMS Dolphin, home of the Royal Navy Submarine Service from 1904 to 1999, located at Gosport's Fort Blockhouse. Eight diesel-electric submarines can be seen berthed alongside the jetties on the right side of the photo. HMS Dolphin underwent tremendous growth between the two world wars and in the post-Second World war period, growing outside the original perimeter of Fort Blockhouse. In 1992, the UK Government announced that the home port of the Royal Navy's submarine fleet would be shifted west to Her Majesty's Naval Base Devonport. The last submarine based at Dolphin, HMS Ursula, departed on 23 December 1994 and the facility closed as a submarine base on 30 September 1998. In 1999, the Royal Navy Submarine School relocated from Dolphin to HMS Raleigh in Cornwall, with only Dolphin's 30-metre tall Submarine Escape Training Tank remaining in use at the re-named Fort Blockhouse. |
 |
| Inside the Sir John Fieldhouse Building's lobby are several Royal Navy submarine-launched weapons, including a Polaris missile. The Polaris A3T missile was the United Kingdom's nuclear deterrent between 1968 and its replacement by the more advanced Trident missile in 1996. Each of the Royal Navy's four Resolution-class ballistic missile submarines carried 16 Polaris missiles, each equipped with three thermonuclear warheads, and with each warhead packing 300 kilotons of high explosive. The order to fire Polaris missiles had to come directly from the Prime Minister. Captain Mike Henry, first Commanding Officer of one of the two crews of ballistic missile submarine HMS Resolution, wrote a poem, 'Prayer for Polaris', reflecting the awesome power of these weapons: 'Give us the will, but never the wish, to obey the order to fire. But O Lord, if it by thy will, grant that order may never need to be given'. |
 |
| The Polaris A3T missile, built by Lockheed Corp, was a two-stage, solid-fuelled, self-guided ballistic missile equipped with an onboard computer able to make course adjustments to ensure the missile arrived over its intended target even if the launching submarine was destroyed in the interim. Each Polaris missile measured 9.86 metres (32.35 feet) in length, with a diameter of 1.37 metres (4.49 feet), and a weight of 16,200 kilograms (35,714.9 lbs). The Polaris had a range of 2,800 miles (4,506 km), reaching a speed of 8,000 mph (12,874.75 km/h). |
 |
| HMS X24, the only surviving Second World War X-Craft midget submarine, on display in a special gallery on the ground floor of the Royal Navy Submarine Museum. X24 was one 20 such midget submarines built in 1943-44 for the Royal Navy and designed to attack targets in circumstances or conditions where a regular submarine could not be used. Built by agricultural machinery manufacturer Marshal, Sons & Company, X24 is best known for its sinking of the 7,500-ton German merchant ship Bärenfels in Nazi-occupied Bergen, Norway on 15 April 1944 (Operation Guidance), followed by its successful destruction of the Laksevåg floating dock in Bergen on 11 September 1944 (Operation Heckle). HMS X24 was saved from the scrapyard after the war and was put on display at the shore establishment HMS Dolphin in Gosport from 1981 to 1987, when she was transferred to the Royal Navy Submarine Museum. |
Below: Three comic book-style depictions of HMS X24's daring mission to sink a floating dock in the heavily-defended harbour of Nazi-occupied Bergen, Norway on 11 September 1944 (Operation Heckle). The mission was a success, with the dock and two small merchant vessels moored alongside it being sunk, thereby denying the Germans the use of the dock to repair their U-boats.


 |
| Looking forward from the starboard side of X24. She measures 15.62 metres (51.25 feet) in length, with a beam of 1.75 metres (5.75 feet), and a draught of 1.60 metres (5.3 feet). When surfaced, the X-Craft displaced 27 tons, increasing to 30 tons when submerged. X-Craft were rated for depths up to 91.5 metres (300 feet), and had a range of 500 nautical miles (926 km) surfaced and 82 nautical miles (151.8 km) submerged at two knots. Despite their small size, the X-Craft were fitted with a wet-dry airlock, a periscope, and sonar, while electromagnets fitted aboard served to reduce the chances of detection by enemy anti-submarine sensors. In addition to X24's exploits, other X-Craft took part in important operations during 1943-44, including an attack that badly damaged the German battleship Tirpitz in September 1943, and activities in support of the D-Day landings in June 1944. |
 |
| The interior of X24, looking forward. Each X-Craft carried a crew of four: commander, pilot, engineer ('Engine Room Artificer'), and a specialist diver. Due to the limited range and cramped conditions inside, midget submarines were towed to their area of operations by a 'mother' submarine, with the four-man operational crew carried aboard the mother sub taking over from the towing crew once in position. The armament carried by each X-Craft comprised two 1,995 kilogram (4,400 pound) detachable charges filled with amatol explosive, which would be laid on the seabed underneath targets and detonated by time fuze. |
 |
| The stern section of X24, showing the Gardner four-cylinder, 42-horsepower diesel engine. Powered by the diesel engine on the surface, submerged operations made use of a 30-horsepower electric motor. X-Craft could attain a speed of 6.5 knots (123 km/h) surfaced and 5.5 knots (10.2 km/h) submerged. |
 |
A closer look at the Gardner diesel engine aboard X24. These 42-horsepower engines were adapted from those used on London buses.
|
 |
| The upper floor of the museum begins with a gallery devoted to life aboard submarines and the mechanics of how these vessels operate. This panel notes the large quantities of food required to sustain the 116 crewmen aboard a Royal Navy hunter-killer submarine, the methods of disposing of sewage and kitchen waste while at sea, as well as the way submariners may escape a damaged submarine when submerged at depths up to 180 metres (590.5 feet). Other panels address the development and improvement of submarine nuclear reactors, the design of streamlined submarine hulls and quiet propellers, and the use of innovative, high-strength materials to permit deeper-diving submarines. A small theatre at the centre of the gallery plays a looped film on the history of the Royal Navy Submarine Service. |
 |
| The ceremonial dress uniform and cocked hat of Vice Admiral Robert Ross-Turner KBE CB DSO, a commander of several early submarines, including HMS C23, D3, E23, and K8. The uniform is of the type worn by Royal Navy officers of all ranks for important military and social occasions. The use of this uniform was discontinued upon the outbreak of war in 1939. Vice Admiral Ross-Turner's medals include the Distinguished Service Order; 1914-15 Star Medal; British War Medal; Victory Medal; 1939-45 Star; Italy Star; Defence Medal; War Medal, 1939-45; George V Silver Jubilee medal; George VI Coronation medal; Order of the British Empire Order of Bath; Order of George I; and the Order of Orange-Nassau. |
 |
| The helm position from a retired Royal Navy submarine. The helmsman uses the yoke to 'fly' the submarine through the water as a pilot would fly an aircraft. Pushing the yoke forward causes the submarine's hydroplanes to change angle, driving the sub downward and pulling the yoke back causes the sub to rise; similarly, turning the wheel causes the rudder to move left or right, thereby changing the sub's course. |
 |
| A display on submarine navigation. As a submarine cannot afford to risk detection by repeatedly surfacing to fix its position from satellite-based navigational radio signals, it uses the Submarine Inertial Navigation System (SINS), a special computer that calculates the sub's position by recording every change of course and speed since the last known position before it submerged. Submarines can also navigate using their sound navigation & ranging (SONAR) systems and bathymetric seabed charts that show all of the valleys, plains, and ridges on the seabed. |
 |
| A full size replica of the Turtle, an early submarine built by American inventor David Bushnell during the American Revolution. Turtle was the first submarine to be used offensively, being deployed in September 1776 to attack the 64-gun British warship HMS Eagle, moored in New York Harbour. Operated by a single crewman, Turtle was submerged by admitting water into a small ballast tank in the base of the vessel and surfaced by pumping out the tank using a hand pump. A pedal-driven propeller was used to move Turtle into position next to its target, at which point a keg of powder would be attached to the victim's hull using the drill mounted on the top of Turtle and detonated by a time fuze. Unable to drill a hole in the Eagle's hull, the attack by Turtle was unsuccessful. |
 |
| A display on the lives of submariners, with several personal items shown, including a small, wooden 'ditty box' in which a submariner had to store all his personal possessions. Life aboard submarines was cramped, smelly, and uncomfortable. With limited fresh water available, submariners rarely washed and wore the same clothing for days on end. The smell of diesel fuel and sweat clung to clothing and the fetid air was only refreshed at night when the submarine surfaced to recharge its electric batteries. Pressure-operated toilets required crewmen to pay careful attention to operating instructions or else they could end up covered in sewage blown back into the boat. With fresh food soon spoiling after departure due to the damp onboard air, the majority of meals came from tins; the only bright spot was the daily issue of the rum ration to sailors. |
 |
| A scale model of the submarine depot ship HMS Latona, originally a 3,700-ton Apollo-class protected cruiser launched in 1890. In 1902, the ageing cruiser was ordered refitted as a submarine depot ship for submarines based at Portsmouth, providing onboard accommodation for the submariners. She was commissioned on 14 October 1902 by Captain Reginald Bacon, the Inspector Captain of Submarines and provided support to early submarine types, such as the Holland-class boats. HMS Latona was converted into a minelayer in 1910 and finally sold off in December 1920. |
 |
| The compass binnacle from HMS A7, circa 1905. Given that the readings of a magnetic compass located inside a submarine's hull would be affected by the magnetism of the surrounding metal, the Royal Navy's A-class submarines had a magnetic compass housed in a watertight binnacle situated on the boat's exterior hull casing. To read the compass, the crew had a periscope that extended up through the hull casing and into the bottom of the binnacle. |
 |
| A painting, entitled 'HMS Titania at Hong Kong' (circa 1920) and depicting the submarine depot ship HMS Titania and one of the L-class submarines that formed the 4th Submarine Flotilla in the Far East. During the summer and autumn each year, the 4th Submarine Flotilla cruised from Wei-Hai-Wei, China to Japan, thereafter returning to Hong Kong for the winter. During the spring, the flotilla would cruise in the South China Sea, making port calls in Singapore, Borneo, or the Philippines. Depot ships like HMS Titania provided accommodation and recreation space for submarine crewmen; workshops; electricity to recharge batteries; and stores of food, fuel, ammunition, torpedoes, and spare parts needed by the submarines. |
 |
| Part of the gallery that takes visitors on a chronological journey through the history of the Royal Navy Submarine Service. |
 |
| A poster depicting the lineup of Royal Navy warships of the Home and Atlantic fleets that were inspected by His Majesty King Edward VII off Cowes on the Isle of Wight on 16 July 1909. On the far right side, 42 submarines and their depot ships took part alongside the dozens of battleships, battlecruisers, cruisers, and destroyers. |
 |
| The painting 'On Patrol, 1914-1918' (1918) by George Bradshaw. Bradshaw commanded the submarine HMS G13 during the First World War and painted this depiction of the rigours of a submarine patrol in the turbulent and blustery North Sea. British submarines patrolled the North Sea as part of Britain's blockade of all German ports. Following retirement from the Royal Navy, George Bradshaw moved to Cornwall and became a full-time marine artist. For many years, this painting hung in the Officers Mess at HMS Dolphin, the shore establishment home of the Royal Navy Submarine Service until 1999. |
 |
| A display of scale models showing the evolution of submarines during and after the First World War. A committee of experts established by the Royal Navy in 1912 made a number of recommendations on how submarines should be developed, leading to a number of novel, but not always successful, designs over the succeeding decade. In the span of ten years, five new classes of submarine appeared in the Royal Navy. In the display case, from bottom row up, are a model of HMS R7, one of 12 such R-class submarines built in 1917-18; a model of HMS K13, a 1917-vintage steam-powered submarine designed to keep up with the battleships of the Grand Fleet; a model of the ill-fated HMS M1, a monitor submarine built in 1918, equipped with a massive 12-inch gun but lost with all hands in a collision in November 1925; a badly-damaged section of voice pipe from HMS Spearfish (1939); a cross-section of the gun housing on HMS M1; fuel pump bevel gear from HMS L18 (circa 1923); and a hydroplane angle indicator from HMS H33 (circa 1935). |
 |
| A display of artefacts from First and Second World War submarines include the top section of HMS E11's search periscope, pierced by a Turkish shell during the boat's first patrol in the Sea of Marmara in May 1915; the smaller attack periscope from E11; a circa 1940 search periscope; a 1943 portrait of Lieutenant Commander David Wanklyn VC DSO, Commanding Officer of HMS Upholder, the Royal Navy's most successful Second World War submarine; Mk VIII torpedo safety forks from HMS Upholder; a First World War vintage 18-inch torpedo tail section and plaque; the Launders slide rule, designed by Lieutenant Jimmy Launders to aid in determining the angle of torpedo attack based on the course, speed, and range of the target; a pair of binoculars belonging to Commander Ben Bryant, circa 1943; and the nose cone of a German shell embedded in the conning tower of HMS E40 during the First World War. |
 |
| A submarine-themed poster promoting the British government's War Savings Scheme, by cartoonist and illustrator Arthur Ferrier. Each year during the Second World War, British towns and villages held a savings week to encourage residents to save their money and contribute to the government's war effort. |
 |
| Displays on British submarine operations in the Mediterranean and Far East during the Second World War. In the Mediterranean, the Royal Navy's Tenth Submarine Flotilla, based at Malta, was ideally placed to interdict Axis supply convoys to North Africa. Despite facing attack from German and Italian anti-submarine vessels and aircraft, as well as minefields, a handful of British submarines succeeded in crippling the Axis supply line to the German army fighting in Africa in 1941 and 1942, contributing to the destruction and surrender of the Germans in Tunisia in May 1943. A buildup of Royal Navy submarine forces in the Far East began at the end of 1943, following victory in the Mediterranean. Lacking air-conditioning, British submarines were ill-suited to service in the searing heat and high humidity of the Far East, and the T- and S-class boats had insufficient range to cover the vast distances between patrol areas in the region. Nevertheless, British submarines took a heavy toll of Japanese warships and merchant vessels: in company with Dutch submarines, they sank 68 merchant ships and one warship in just five days in November 1944. Other notable successes in the Far East included HMS Tally Ho's sinking of the Japanese cruiser Kuma on 11 January 1944 and HMS Trenchant's destruction of the battleship Ashigara on 8 June 1945. |
 |
| The white ensign flown by the Royal Navy's most famous submarine of the First World War, HMS E11. This E-class boat was launched on 23 April 1914 and sank 85 enemy vessels during three tours of duty in the Sea of Marmara as part of British naval operations in the Dardanelles Campaign of 1915. For their daring and bravery, the entire crew of HMS E11 was awarded medals, including the Victoria Cross for her commanding officer, Lieutenant-Commander Martin Nasmith. HMS E11 was sold for scrap in Malta in March 1921. Flown from the stern of the vessel, the lower half of the white ensign is stained by soot from E11's engine exhausts. |
 |
| The honours board from HMS Rorqual (N74), a Grampus-class minelaying submarine commissioned in February 1937. The only Grampus-class boat to survive the Second World War, Rorqual served in the Mediterranean and Far East theatres and is considered the most successful minelaying submarine of the war, sinking over 57,000 gross tons of enemy shipping, including 35,951 gross tons from mines she had laid. Rorqual was sold for scrap in November 1945 and broken up in March 1946. The honours board shows the theatres of war in which a vessel served. |
 |
| A display cabinet showcasing artefacts from the Far East theatre of operations in the Second World War. An ashtray in the shape of Australia was a souvenir purchased by Telegraphist Peter E Kent to remember his time serving in the Royal Navy's Fourth Submarine Flotilla, based in Sydney, Australia between 1943 and 1967, and which provided anti-submarine training to the Royal Australian Navy which did not possess any submarines of its own until 1967. Also shown in this photo is a Japanese sword surrendered to Captain Ian Thomas Scott-Bell DSC by the Japanese commander of the 4,000 officers and men occupying Tut Dat Mot Airfield in French Indo-China in 1945. |
 |
| A model of HMS Thunderbolt (N25), a T-class submarine originally named Thetis which sank during sea trials on 1 June 1939 with the loss of 99 lives. Salvaged, repaired, and recommissioned as Thunderbolt, the submarine served in the Atlantic and Mediterranean theatres during the Second World War, sinking a number of small vessels and launching human torpedoes (chariots). A notable success by Thunderbolt was her sinking of the Italian submarine Capitano Raffaele Tarantini in the Bay of Biscay on 15 December 1940. Thunderbolt's end came on 14 March 1943, when she was sunk off Sicily by the Italian corvette Cicogna while attempting to attack an Axis convoy destined for North Africa; she sank in 1,350 metres (4,400 feet) of water with the loss of all personnel aboard. |
 |
| A model of HMS Storm, an S-class submarine commissioned on 9 July 1943 and assigned to the Far East theatre during the Second World War. She is depicted in the standard camouflage pattern worn by Far East-based boats during the war. Based out of Trincomalee, Ceylon and later Fremantle, Australia, Storm sank a number of Japanese merchant vessels, a minesweeper, and several gunboats during a number of patrols in the Pacific and Indian oceans. HMS Storm was commanded by Lieutenant Commander Edward Young DSO DSC Royal Naval Volunteer Reserve (RNVR), the first officer of the RNVR to command a submarine. |
 |
| The ship's bell from HMS Trenchant, a T-class submarine launched on 24 March 1943 and commissioned on 26 February 1944. Serving in the Far East during 1944-45, Trenchant sank a number of enemy transports and warships using torpedoes, gunfire, and even ramming. She sank the German U-boat U-859 in the Straits of Malacca on 23 September 1944, taking 11 Germans prisoner; and on 27 October 1944, human torpedoes carried into action by Trenchant succeeded in sinking a Japanese Army transport vessel in Phuket harbour. On 8 June 1945, Trenchant scored her most notable success, sinking the Japanese heavy cruiser Ashigara with torpedoes in the Bangka Strait of the Java Sea, with the loss of 1,350 Japanese personnel, including 1,200 Japanese Army troops being transported to Singapore. HMS Trenchant was sold for scrap on 1 July 1963 and broken up at Faslane, Scotland. |
 |
| Artefacts captured from German U-boats in the First and Second World Wars, including a Second World War-era signalling pistol; a pair of binoculars; a submarine torpedo calculator; a Lusitania medallion awarded to the crew of U-20, which sank the New York-bound Cunard liner on 7 May 1915; a German U-boat war badge; and a German officer's dirk. A German Nazi ensign (national war flag) taken from U-541 during her surrender to HMS Vampire in the Straits of Gibraltar in 1945 hangs on the back wall (right), while an Imperial Germany Navy ensign from the First World War hangs to the left. |
 |
| The ceremonial frock coat of Admiral Sir Martin Nasmith VC (1883-1965) of a style worn by all officers of the Royal Navy until its discontinuance upon the outbreak of the Second World War in 1939. Nasmith won the Victoria Cross while in command of HMS E11 during the Dardanelles Campaign (1915), and later went on to command the Seventh Submarine Flotilla, captain the battleship HMS Iron Duke, and serve as Rear Admiral Submarines, Commander-in-Chief East Indies, Second Sea Lord, Commander-in-Chief Plymouth, Commander-in-Chief Plymouth and Western Approaches Command, and Flag Officer-in-Charge London. He retired in 1946. |
 |
| An exhibit of Jolly Roger flags flown by British submarines returning to port after successful patrols. This custom originated with Lieutenant Commander Max Horton, who hoisted a Jolly Roger from his boat, HMS E9, as he returned to the port of Harwich after sinking the German cruiser SMS Hela in the North Sea on 13 September 1914. The use of the Jolly Roger was a humorous homage to Admiral Arthur Wilson VC, Controller of the Royal Navy, who in 1901 had commented that '[t]he crews of all submarines captured should be treated as pirates and hanged'. The use of the Jolly Roger was taken up by all Royal Navy submarines during the Second World War, and has continued as tradition ever since: HMS Conqueror, a nuclear-powered attack submarine, flew the Jolly Roger after sinking the Argentine cruiser ARA General Belgrano on 2 May 1982, during the Falklands War. More recently, Royal Navy submarines have returned to port flying the Jolly Roger after successfully firing Tomahawk cruise missiles during the Iraq War of 2003. The various symbols used on the Jolly Rogers denote the types of missions carried out or targets destroyed. |
 |
| The ship's bell of HMS Dolphin, the shore establishment in Gosport that was home to the Royal Navy Submarine Service between 1904 and 1999. The establishment was named after HMS Dolphin, a 929-ton sloop that was moored alongside Fort Blockhouse and which provided accommodations for early submariners. |
 |
| A painting depicting Queen Elizabeth II's launching of HMS Dreadnought (S101), Britain's first nuclear-powered submarine, on 21 October 1960. Built by Vickers Armstrongs in Barrow-in-Furness, the boat was powered by a fifth generation Westinghouse submarine nuclear reactor designed in the United States and provided to Britain under the 1958 US-UK Mutual Defence Agreement. Dreadnought measured 80.47 metres (264 feet) in length, with a displacement of 3,556 tonnes surfaced and 4,064 tonnes submerged. She had a top speed of 20 knots (37 km/h) surfaced and 28 knots (52 km/h) submerged, and carried 24 21-inch torpedoes fired from 6 bow tubes as her sole armament. |
 |
| A large model of HMS Dreadnought, made by Vickers Armstrongs (Shipbuilders) Ltd of Barrow-in-Furness in 1963. Compared to previous diesel electric boats, Dreadnought was a revolution in habitability for her 113 crewmen. After a varied career, which included service in European, Mediterranean, and Far East waters, as well as a surfacing at the North Pole (a first for a British nuclear submarine), HMS Dreadnought was decommissioned in 1980 and currently remains laid up in Rosyth Dockyard in Scotland, awaiting dismantling under the UK Ministry of Defence's Submarine Dismantling Project. |
 |
| A diorama constructed in the 1970s, depicting the submarine depot ship HMS Forth (A187) with various types of contemporary Royal Navy submarines moored alongside. Moored immediately alongside HMS Forth is a nuclear-powered Resolution-class ballistic missile submarine equipped with Polaris nuclear missiles. It should be noted that a ballistic missile submarine would never have been serviced by a depot ship, as the level of security was insufficient and the range and complexity of support activities required by such a submarine greatly outstripped those available on a depot ship, necessitating the use of shore establishments. The submarine moored in the middle is a nuclear-powered Valiant-class hunter killer submarine. The outboard submarine is a diesel electric Oberon-class boat. HMS Forth entered service in May 1939, was renamed HMS Defiance in February 1972, and was decommissioned in January 1979, being sold for scrap in July 1985. Four Resolution-class submarines served between 1968 and 1996; the two Valiant-class boats served between 1966 and 1994; and 13 Oberon-class submarines served between 1960 and 1993. |
 |
| The gallery devoted to the Submarine Service in the late 20th century tells the story of submarine operations in the Falklands War of 1982. The Royal Navy nuclear submarines HMS Spartan, Splendid, and Conqueror were the first vessels of the task force assembled by the UK government to reach the Falklands, arriving in the South Atlantic unseen and undetected by Argentine forces. These submarines immediately commenced intelligence-gathering operations while the surface fleet steamed 8,000 miles from the UK. After the UK government had declared a 200-mile Total Exclusion Zone around the Falklands and threatened to attack any Argentine forces deemed a threat to the task force, at 6:57pm on 2 May 1982 HMS Conqueror fired three torpedoes at the Argentine cruiser ARA General Belgrano, hitting her in the bow and stern and sinking her with heavy loss of life. In his memoirs, Admiral Sandy Woodward, commanding the British naval task force in the Falklands, asserted about the sinking of the Belgrano: 'I have no doubt that it was the best thing we ever did. It cut the heart out of the Argentine Navy and we had only their Air Force to deal with then. That was a very considerable advantage'. |
 |
| The brass nameplate from the Churchill-class nuclear-powered hunter killer submarine HMS Conqueror (S48). On 2 May 1982, Conqueror became the first British nuclear submarine to fire torpedoes in anger, using three Mk VIII torpedoes originally developed in 1921 to sink the Argentine cruiser General Belgrano, an ex-US Navy Brooklyn-class cruiser originally launched in 1938. |
 |
| The battle honours board from HMS Conqueror. As per custom, a ship carries the battle honours awarded to all preceding warships of the same name. The submarine was the 10th vessel to be named Conqueror, the first having been an eight-gun fireship captured from the French in 1745. |
 |
| The captain's cabin from HMS Conqueror, reconstructed at the Royal Navy Submarine Museum. After her exploits in the Falklands War, Conqueror was involved in a December 1982 joint British-American raid (Operation Barmaid) to acquire a Soviet sonar array from its Polish-flagged towing vessel. The operation, which took place on the edge of Soviet territorial waters was successful, with Conqueror using cutters on her bow to sever the three-inch thick towing wire before returning to base. After being decommissioned on 2 August 1990, Conqueror was placed in storage at Her Majesty's Naval Base Devonport, and is awaiting disposal under the Submarine Dismantling Project. |
 |
| Along with her captain's cabin, control room main panel, and other artefacts, HMS Conqueror's periscopes were saved and have been put on display in the Royal Navy Submarine Museum. |
 |
| The nose cone of a Chevaline Polaris missile (left) and the Chevaline penetration aid carrier (right). The nose cone protected the Polaris missile's payload during underwater launch and flight, being ejected from the missile after it reached the Earth's upper atmosphere. Chevaline was an upgraded version of Polaris, designed by the British Atomic Weapons Establishment, the Royal Aircraft Establishment in Farnborough, Lockheed Aerospace, and other partners in the UK and USA to improve the penetrability of the warheads carried on the UK's Polaris nuclear missile deterrent. The system was a response to improved Soviet anti-ballistic missile (ABM) defences around Moscow and was designed to overwhelm the defences with various decoys that would improve the odds of at least one warhead reaching its target, thereby deterring a Soviet first strike. |
 |
| A Chevaline penetration aid carrier (PAC), which would have separated from the Polaris missile's second stage rocket booster after reaching the upper atmosphere. The PAC carried and deployed a range of decoys in addition to the re-entry bodies (ReB) containing the nuclear warheads. Long- and short-throw decoys, spool-chaff, and other penetration aids would be dispersed into a pre-determined 'threat tube' 241 km (150 miles) long surrounding the ReBs and warheads. In this manner, Soviet anti-missile radar systems would be overwhelmed by the numerous moving targets (warheads and decoys), resulting in anti-ballistic missile defences being expended and a higher probability of at least one warhead surviving and hitting its intended target. A replica of a ReB is seen in the background; three ReBs were carried on each missile, with each ReB carrying a single nuclear warhead. The yield of each warhead was equivalent to 200,000 tons of high explosive. Combined, the explosive power of the three warheads carried by a single Polaris missile was eight times that of the atomic bomb dropped on Hiroshima on 6 August 1945. |
 |
| A display on the portrayal of submarines and submariners in pop culture, including several framed posters for films involving submarine-based plots, which are often over-dramatised or simplified for audiences unfamiliar with the secretive world of actual submarine operations. |
 |
| A promotional poster for the 1977 James Bond spy thriller The Spy Who Loved Me, whose plot involves a scheme by megalomaniac super-villain Karl Stromberg to steal British and Soviet ballistic missile submarines in order to start a war to destroy civilisation, after which Stromberg would create a new society under the sea. |
 |
| A cutaway model of a Resolution-class nuclear ballistic missile submarine equipped with Polaris missiles. The first of four Resolution-class boats entered service in 1967 and on 1 July 1969, responsibility for maintaining the UK's nuclear deterrent passed from the Royal Air Force's V-bomber force to the Royal Navy's Polaris missile-equipped submarines. Royal Navy submariners nicknamed Polaris-armed submarines 'Bombers' and 'Bomber patrols' during the Cold War meant long, silent voyages in the ocean depths for up to three months in order to provide the UK with a credible nuclear deterrent against foreign aggression. With four Resolution-class submarines in service, one boat was always at sea on nuclear deterrence patrol. |
 |
| A wooden board with the names of all commanding officers of the Resolution-class nuclear ballistic missile submarine HMS Revenge (S27). Revenge, the last of four Resolution-class boats, was built by Cammell Laird in Birkenhead and commissioned on 4 December 1969; she was decommissioned in May 1992 and is currently awaiting dismantling at Rosyth Dockyard in Scotland. |
 |
| A wooden board from the Resolution-class nuclear ballistic missile submarine HMS Renown (S26), containing statistics on the boat's measurements, complement, propulsion, and armament. |
 |
| A memorial to the more than 5,300 submariners killed since the establishment of the Royal Navy Submarine Service. The memorial lists the names of all 150 Royal Navy submarines lost at sea, from the A-class submarine HMS A1, lost on 18 March 1904, to the S-class submarine HMS Sidon (P259), lost on 16 June 1955. During the Second World War, the casualty rate amongst Royal Navy submariners was a whopping 35 percent. HMS Affray, a sister sub to HMS Alliance, was the second-last submarine lost to the Royal Navy and the last one lost while at sea. Affray foundered in the English Channel on 16 April 1951 during an exercise and was discovered in 86 metres (282 feet) of water on 14 June after an extensive search by Royal Navy vessels; all 75 men on board died. |
 |
| The conning tower of HMS E17, an E-class submarine of the Royal Navy commissioned on 7 April 1915. E17 was wrecked in the North Sea off the Dutch island of Texel on 6 January 1916, her crew of three officers and 28 men being rescued and interned by the Dutch cruiser HNLMS Noordbrabant. The conning tower was unveiled on the grounds of the Royal Navy Submarine Museum on 24 November 1989 by the Earl of Erroll, a descendant of E17's commanding officer, Sir Guy Moncreiffe of that Ilk. |
HMS Holland I
 |
| A starboard bow view of HM Submarine Torpedo Boat No. 1 (Holland I), the Royal Navy's first submarine, designed by Irish-American inventor John Holland of the American Electric Boat Company. While the British Admiralty received numerous proposals for submarine vessels between 1860 and 1900 and kept close watch on submarine developments in other countries during this time, it was the significant advances in submarine development observed in France which provided the catalyst for the procurement of Holland I and her sisters. Exhibited since 2001 in a special, climate-controlled gallery adjacent to the main museum building, Holland I was ordered in 1900 and laid down at the Vickers Maxim yard in Barrow-in-Furness, Cumbria on 4 February 1901, being secretly constructed in a building marked 'Yacht Shed'. Launched on 2 October 1901, the boat was one of a batch of five such Holland-class submarines acquired by the Royal Navy in 1901-02 and arrived at Portsmouth in September 1902 to form the First Submarine Flotilla under Captain Reginald Bacon. |
 |
| A closeup view of HMS Holland I's bow-mounted torpedo tube. The boat carried up to three 18-inch torpedoes which were launched by the Torpedo Instructor and a Leading Seaman using high pressure water carried in a tank in the interior of the submarine. The small (120-ton) and cramped Holland-class boats were essentially limited to harbour and coastal defence duties, but proved tricky to handle both on the surface and underwater. |
 |
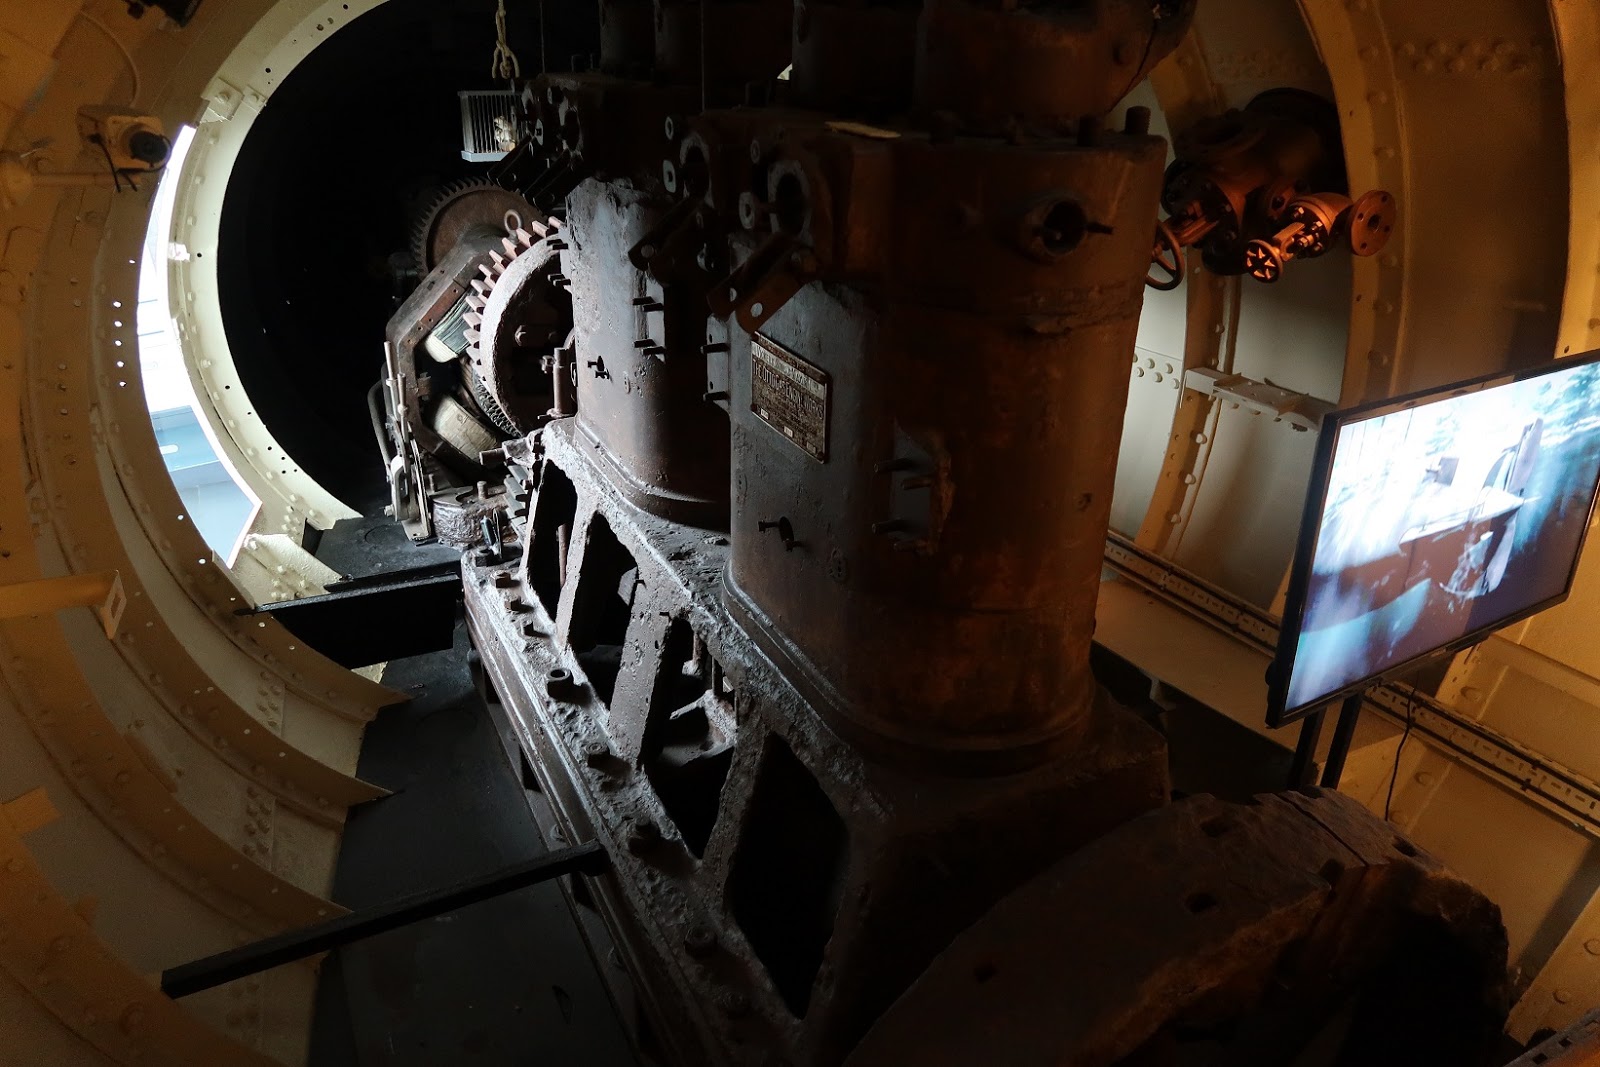
| A starboard quarter view of Holland I, showing the rudder and propeller. A section of the hull has been cut out to permit visitors to look into the boat's engine compartment. Holland I measures 19.16 metres (63 feet 10 inches) long, with a beam of 3.58 metres (11 feet 9 inches), and with a submerged displacement of 107 tons. The 9-man crew comprised a Commanding Officer (Lieutenant), a Sub-Lieutenant, a Coxswain, a Torpedo Instructor, a Chief Engineering Artificer, a Leading Stoker, a Stoker, a Leading Seaman, and an Able Seaman. |
 |
| HMS Holland I's small conning tower, located atop the hull. The boat's Commanding Officer, a Lieutenant, could peer out of the glass-paned view ports. |
 |
| A port bow view. A panel cut out of the hull allows visitors to step inside Holland I for a look at the cramped interior. Considered obsolete by 1913, Holland I was decommissioned on 5 November of that year and sold to a scrap dealer for £410; however, while under tow to the scrapyard, the boat began taking on water and sank off Cornwall. Located in 1981, the wreck of Holland I was raised in November 1982 and put on display at the Royal Navy Submarine Museum. Restoration work was carried out between 1983 and the late 1990s, with the final step being the construction of the indoor exhibit space, opened by Countess Mountbatten of Burma on 24 May 2001 to mark the centenary of Holland I's construction. |
 |
| The sole torpedo tube, mounted at the submarine's bow, with the high-pressure water tank mounted above and used to blow the torpedo out of the tube when firing. |
 |
| Looking forward inside Holland I. The wheel was used to steer the boat while manoeuvring underwater. The second-in-command, a Sub-Lieutenant, was responsible for steering and navigation, assisted by the Coxswain. Holland I could dive to a depth of 30.48 metres (100 feet) and travel up to 37 kilometres (20 nautical miles) at 7 knots (13 km/h). From this position, the helmsman would also have looked through the search periscope and the compass-viewing periscope; the latter was necessary, as the boat's navigational compass was located on the exterior upper deck in order to minimise magnetic interference from metallic objects inside the hull. While the early-type periscope fitted on Holland I could be rotated 180 degrees to look behind the boat, doing so meant the image appeared upside-down. |
 |
| The 160-horsepower, US-manufactured gasoline engine which provided propulsion when surfaced. Holland I carried 2,271.25 litres (600 gallons) of gasoline for this engine. When submerged, propulsion was provided by a 70-horsepower electric motor powered by 60 battery cells located under the deck and weighing a combined 25 tons. |
 |
| Another view of the gasoline engine and part of the electric motor and gearing. Mice in a cage were carried aboard the submarine to give the crew early warning of the buildup of toxic gasoline fumes or exhaust gases inside the hull; nevertheless, on 3 March 1903, HMS Holland I experienced a major gasoline explosion which seriously injured two crewmen. |
 |
| A closeup view of the tank used to store the boat's fuel for the gasoline engine. |
 |
| A scale model of HMS Holland I on display in the Holland I gallery. |
HMS Alliance (P147 / S67)
 |
| A photo of HMS Alliance as originally completed in 1947. Alliance was one of 16 Amphion-class submarines built in the last two years of the Second World War and specifically designed for service in the Far East. With the exception of HMS Amphion and Astute, none of the 16 boats of this class entered service before the end of the war; however, they were upgraded in the post-war period and extensively refitted between 1955 and 1960, going on to serve as the backbone of the Royal Navy Submarine Service for three decades before the final Amphion-class boat, HMS Andrew, was decommissioned in 1975. Of the 16 Amphion-class submarines that served in the Royal Navy, HMS Alliance is the only surviving example, and the only British Second World War era submarine on display. |
 |
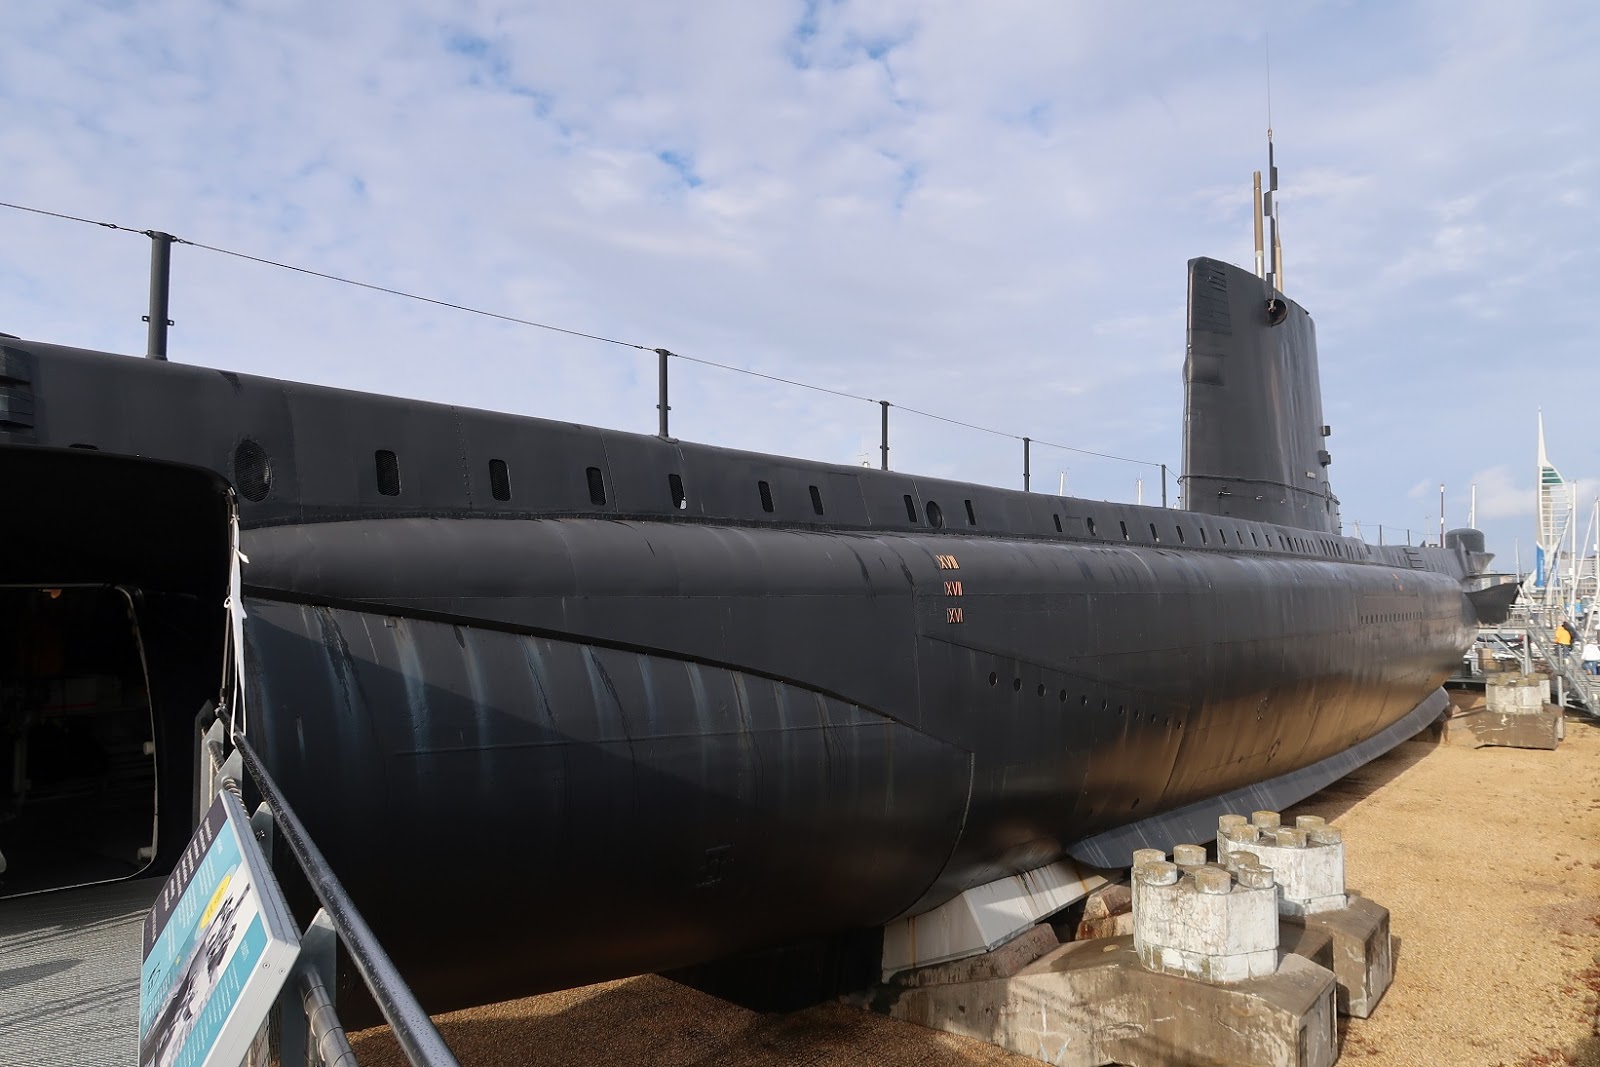
| HMS Alliance today, showing the result of the extensive modernisation refit carried out in 1958-60. Alterations included a complete reconstruction of the forward and after hull sections, a lengthened and streamlined upper deck and conning tower to reduce noise and improve submerged speed, and the removal of the Quick Firing 4-inch Mk XXIII deck gun and external torpedo tubes. The 1958-60 modernisation refit also included the installation of a powerful SONAR (sound navigation & ranging) system in place of the Second World War-era passive hydrophone (underwater microphone); the new SONAR system was fitted under a large dome on the submarine's bow, as seen in the photo. |
 |
| A head-on view of Alliance, showing the flared bow, torpedo tube doors, and hydroplanes. HMS Alliance served the Royal Navy for 26 years before being decommissioned in 1973 and used as a static training vessel at Gosport's HMS Dolphin shore establishment for the next six years. In 1979, the Royal Navy commenced efforts to preserve Alliance as the last submarine from the Second World War and, in 1981, she was opened to the public as part of the Royal Navy Submarine Museum. |
 |
| A starboard bow view of HMS Alliance, high and dry in a cradle next to the Royal Navy Submarine Museum main building. Following their 1950s modernisation refits, the Amphion-class submarines measured 85.77 metres (281 feet 4 inches) in length, with a beam of 6.78 metres (22 feet 3 inches), and a displacement of 1,385 tons surfaced and 1,620 tons submerged. A set of stairs leads up from the museum grounds to a doorway cut into Alliance's forward torpedo compartment, from where visitors begin their tour through the submarine's interior spaces. |
 |
| HMS Alliance's conning tower, also known as the 'fin', was significantly modified during the boat's 1958-60 modernisation refit, being enclosed by an aluminium shell to improve underwater performance. When cruising on the surface, the navigation of the boat would be controlled by the Officer of the Watch from the bridge atop the conning tower. Lookouts would also be posted on the bridge to scan the horizon and sky in search of enemy vessels and aircraft. Using the compasses on the bridge, the Officer of the Watch would issue steering orders to the helmsman in the Control Room using the intercom or backup voice pipe. Seen projecting up through the conning tower are the search and attack periscopes used, respectively, to locate and attack targets when the submarine was operating submerged. |
 |
HMS Alliance's crest.
|
 |
| The Forward Torpedo Compartment, showing two of the four torpedo tubes located here. The propellers of a 21-inch torpedo can be seen in the open upper tube. As originally built, HMS Alliance had six forward torpedo tubes, four in this Forward Torpedo Compartment and two mounted externally on the hull. While the external tubes were loaded with one torpedo each while in harbour and were inaccessible thereafter, the four tubes in the compartment could be fired and reloaded. Six reload torpedoes were carried in racks in this compartment, in addition to the four torpedoes loaded in the tubes at the beginning of a deployment. In total, Alliance carried 18 torpedoes between the forward and aft torpedo compartments. Escape hatches and emergency breathing systems were located in both the forward and aft torpedo compartments and the boat's crew was trained to escape through these hatches after first flooding the compartments to equalise the pressure inside the submarine with that outside. |
 |
| The rear of the Forward Torpedo Compartment showing the tail end of a 21-inch torpedo, net bags of citrus fruit hanging from the deckhead, and cases and crates of tinned peas, carrots, and baked beans lashed together with rope. Notwithstanding the increased storage space provided on the large Amphion-class boats, when deploying on patrol, food for the crew of 65 officers and men had to be stored in any available space inside the boat, including the toilets, the main passageway, and here in the torpedo compartment. |
 |
| Looking aft down the passageway leading from the Forward Torpedo Compartment, past the messes, and into the Control Room. To provide better living conditions for submariners operating in the hot, humid Far East, the Amphion-class boats were fitted with air conditioning and living quarters were positioned as far forward as possible, away from the heat and smells of the Engine Room and heads (toilets). As the four main messes aboard HMS Alliance were not sufficiently large to accommodate all of the crew, 12 additional bunks were installed in the main passageway, as seen on the left of the photo. |
 |
| The main passageway leading aft. On the right is the Seaman's Mess, the largest of the submarine's four messes, housing 30 of the boat's Junior Ratings. The red tube and green canisters are part of a chemical oxygen generator and air purifying system used to scrub carbon dioxide from the air inside the submarine in case it was not possible to surface and ventilate the boat. |
 |
| A closer look at the Seaman's Mess, which includes a large table on which meals were eaten and even a projector for showing films while on patrol. HMS Alliance used a three-watch rotational schedule, with one-third of the crew on duty at any given time, while the remainder would be sleeping or off duty; however, when diving stations or action stations was called, every member of the crew would report to his duty post. |
 |
| The Stokers' Mess. It was here that the ratings who worked in the Engine Room lived. |
 |
| The Petty Officers' Mess, home to the boat's most senior non-commissioned officers who were skilled technicians and whose job included supervising the Junior Ratings. |
 |
The Engine Room Artificers' (ERA) Mess, where these technical specialists slept, ate, and relaxed when off duty. ERAs were the senior maintainers and operators of all the mechanical items aboard the submarine, working under an Engineering Officer.
| |
 |
| One view of the Wardroom, the preserve of the submarine's five officers. The Wardroom was located adjacent to the control room so that the officers could get to their stations as rapidly as possible in an emergency. It also served as the 'ship's office' for administrative work. |
 |
| Another view of the Wardroom, showing the settees and folding bunks on which the officers slept and relaxed when off duty. Small drawers in the base of the settees provided limited space for clothing and personal effects. The Captain did not sleep here, having his own small private cabin in the conning tower, located above the Control Room. This arrangement was unique to the Amphion-class boats and intended to permit easy access to the bridge by the Captain; however, in practice this arrangement was found to be inconvenient, and the Captain instead spent much of his free time as a guest in the Wardroom in order to be close to the Control Room, as he was on call 24 hours a day. |
 |
| Looking forward, up the narrow main passageway. |
 |
| The Control Room, the nerve centre of HMS Alliance, from where the boat was navigated and fought. The equipment found in the Control Room is a mix of original gear fitted when the boat entered service in 1947 and more modern items added during the 1958-60 modernisation. |
 |
| The steering position, located at the front of the Control Room, facing forward. Using a yoke, the helmsman controlled the rudder and hydroplanes to make the boat ascend or descend and turn left or right. The original wooden steering wheel and hydroplane levers were replaced by the current steering gear in the 1950s. |
 |
| Looking at the port side of the Control Room, where crewmen controlled the boat's depth using valves, either taking on water in the ballast tanks to descend or blowing water out of the ballast tanks with compressed air to ascend. In the foreground is the attack periscope, used to execute torpedo attacks on targets when submerged. When not in use, the handles of the attack periscope folded up and the periscope descended into a well in the deck. |
 |
| Just a few of the bewildering array of gauges, switches, and flywheels in the Control Room. |
 |
| The Muirhead Mk 16 torpedo control calculator, known to submariners as the 'fruit machine', in the Control Room. This 1960s-era electro-mechanical device was used to run the trigonometric calculations necessary to identify the proper gyro angle setting for the torpedoes. The gyro angle setting determined the compass heading the torpedoes would take after being launched from the boat's tubes. The dials on the fruit machine display data inputs, including the target's speed, range, course, bearing, and depth, as well as the attacker's own coordinates. The display is backlit so that the crew could clearly read the indicators even when the Control Room lighting was switched to red in order to preserve the men's night vision. |
 |
| The torpedo control board showing the status of each torpedo tube using red lights. |
 |
| On the starboard side of the Control Room is the navigator's plotting table next to the SONAR display (the console with the circular screen). With astronomical sightings and radio-navigation aids unavailable when operating submerged, the boat's Navigating Officer had to rely on dead reckoning navigation, keeping track of all course, speed, and depth changes since the last known position and taking into account currents and tides to arrive at an educated guess of the boat's current position. Because of the uncertainty in plotting a boat's precise location, submarines in wartime were allocated patrol areas to avoid being mistakenly attacked by friendly forces. |
 |
| The display showing the position of the submarine's forward and aft hydroplanes, which drove the submarine up or down in the water depending on the angle to which they were set. HMS Alliance could dive up to 152.4 metres (500 feet). |
 |
| The Wireless Office, from which radio communications were sent and received by HMS Alliance. A High-Frequency (H/F) wireless whip aerial could be raised from the submarine's conning tower to send urgent signals, such as enemy sighting reports. When operating submerged, Alliance was able to receive radio messages over a special submarine Very-Low Frequency (VLF) signal, which did not require any aerial to be exposed above the surface of the sea. |
 |
The Radar Office. A telescopic electronic support measures mast fitted with a search radar and projecting up through the conning tower could be raised when Alliance was operating at periscope depth in order to detect enemy ships and aircraft, especially at night when making visual sightings using the periscope was difficult; however, this mast was raised only when absolutely necessary in order to minimise the risk of detection.
|
 |
| The head (toilet) for the sailors. (The officers had a separate head with a white toilet seat.) Operation of the heads was a complicated affair requiring close attention to instructions. Sewage was collected in a tank and discharged into the sea by pressurising the tank until its internal pressure was greater than the water pressure outside the submarine. After discharging the sewage, the tank had to be depressurised before the heads could be used again, a process that vented the smell of sewage back into the submarine's interior. |
 |
| Looking down the main passageway towards the Engine Room. |
 |
| The crew's wash space, mostly used to store food supplies rather than for its designed purpose. As HMS Alliance carried only enough fresh water for drinking and limited washing (i.e. brushing of teeth), sailors were not able to bathe, shave, or wash their clothing. With socks and underwear changed perhaps weekly at best, submariners returning to port after a long patrol were particularly pungent. |
 |
| The Galley, in which the cook and his assistant prepared three meals a day for five officers and 60 ratings. Often two meal choices were offered by the Galley staff, as food was an important part of maintaining good crew morale. Generally, the cook would work during the day preparing and serving the meals, while the assistant would work at night baking bread for the next day. Fresh fruit and vegetables would be eaten during the first few days of a patrol, before they spoiled in the damp, fetid air inside the submarine; thereafter, the crew subsisted on frozen and canned food. To assist with meal preparation, such as peeling potatoes, each mess (accommodation space) provided one man on rotation, who also collected the meals from the Galley and delivered them to the mess where he and his messmates ate; a rotation of men from the messes also was assigned to washing the meal dishes. While the boat's officers ate the same food as the ratings, they enjoyed the services of a Wardroom steward who collected the officers' meals from the Galley and took care of the washing up. Coffee and tea was made by using water from a boiler situated at the head of the main passageway. |
 |
| Looking aft, into the Engine Room. Designed with a larger fuel capacity for the kind of lengthy patrols that were a hallmark of Second World War submarine operations in the Pacific and Indian Oceans, Amphion-class boats like HMS Alliance had a surfaced range of over 16,000 kilometres (10,000 miles) at 11 knots (20.37 km/h) using their diesel engines. |
 |
| When surfaced, HMS Alliance was propelled by two 2,000-horsepower supercharged Vickers 8-cylinder diesel engines, each weighing 30 tons. These diesels were also used to re-charge the boat's electric batteries. The snort, or snorkel, installed on the Amphion-class and other British post-war diesel-electric submarines allowed them to run on their diesel engines while travelling submerged at periscope depth, with air being drawn into the boat through the snort mast and diesel exhaust fumes vented the same way; a special floating valve at the top of the snort mast prevented seawater from entering the boat if a wave crested the top of the mast. The submarine could cruise at a faster speed using its diesel engines (34.3 km/h vs 18.5 km/h using electric motors), while remaining submerged and simultaneously recharging its batteries. Remaining submerged as much as possible reduced the risk of detection and attack compared to surface cruising. In a demonstration of the utility of the snort mast, HMS Alliance completed a record-breaking three-week cruise continuously submerged shortly after she commissioned in 1947. |
 |
| The supercharger clutch gear for the port side Vickers 8-cylinder diesel engine. Clutches connected the diesel engines to the electric motors located in the Motor Room and from there to the two propeller shafts. When running on diesel engines, the noise in the Engine Room was so loud that crewmen working in this compartment had to communicate using hand signals. When clutched to the diesel engines, the electric motors could be used as generators to recharge the boat's bank of 226 lead acid cell batteries which supplied the propulsive power when the submarine was operating submerged. In light of the hydrogen gas generated when re-charging lead acid batteries, careful precautions were taken to safely vent this gas from the boat; nevertheless, in March 1968, while charging batteries in harbour, accumulated hydrogen gas ignited, causing an explosion which ripped through the forward messes, killing one crewman and injuring several others. |
 |
| The Motor Room aft of the Engine Room, where the boat's two 625-horsepower electric motors were housed. When operating submerged and below snorkelling depth, the boat was propelled using these motors and the electrical charge contained in the 226 lead acid cell batteries, each weighing 1,000 pounds, stored in two tanks below deck level forward and aft of the Control Room. |
 |
| The electrical switching gear used to control the electric motors. Unlike the diesel engines, the electric motors could be run in reverse and so were especially useful in manoeuvring the boat in tight spaces, such as when docking in a harbour. If run at full power, HMS Alliance's electric motors could propel the boat at more than 10 knots (18.5 km/h), but only for 25.7 km (16 miles) at which point the the batteries would be completely exhausted. Instead, a more economical underwater speed of 3 knots (5.5 km/h) could be maintained for 144.8 km (90 miles). |
 |
| The Aft Torpedo Compartment, containing two torpedo tubes. A total of six 21-inch torpedoes were carried here, comprising one each in the tubes and four reload torpedoes stored in racks along the port and starboard sides of the compartment. Although HMS Alliance was originally equipped in 1947 with the Mk VIII diesel-powered torpedo carrying a 365 kilogram (804.7 pound) high-explosive warhead, this weapon was primarily designed to be used against surface ships at close range and was deemed unsuitable for hunting submerged Soviet submarines, one of the Royal Navy Submarine Service's primary missions during the Cold War. As such, Alliance was subsequently fitted with equipment which permitted her to fire the new Mk 23 wire-guided electrically-powered torpedo. |
 |
| Visitors exit HMS Alliance's Aft Torpedo Compartment via a door cut into the pressure hull. |